

Here are the steps to follow to create a job offer on Jobboom.
Connecting to your Jobboom account
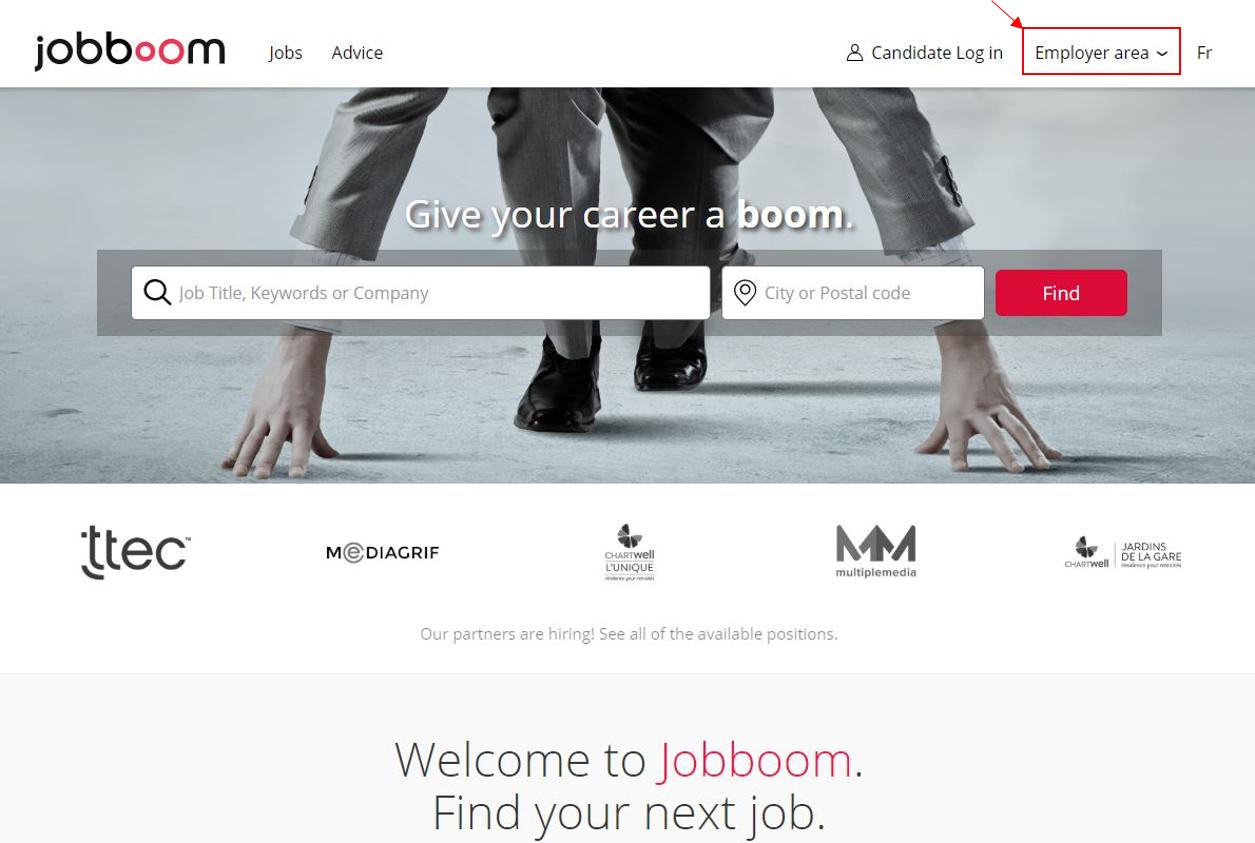
- Go to the Jobboom website at jobboom.com
- Click the Employer Area tab at the upper right side of the screen and you will be prompted to enter your Jobboom account number (EXXXXX) and your password to log in to your account.
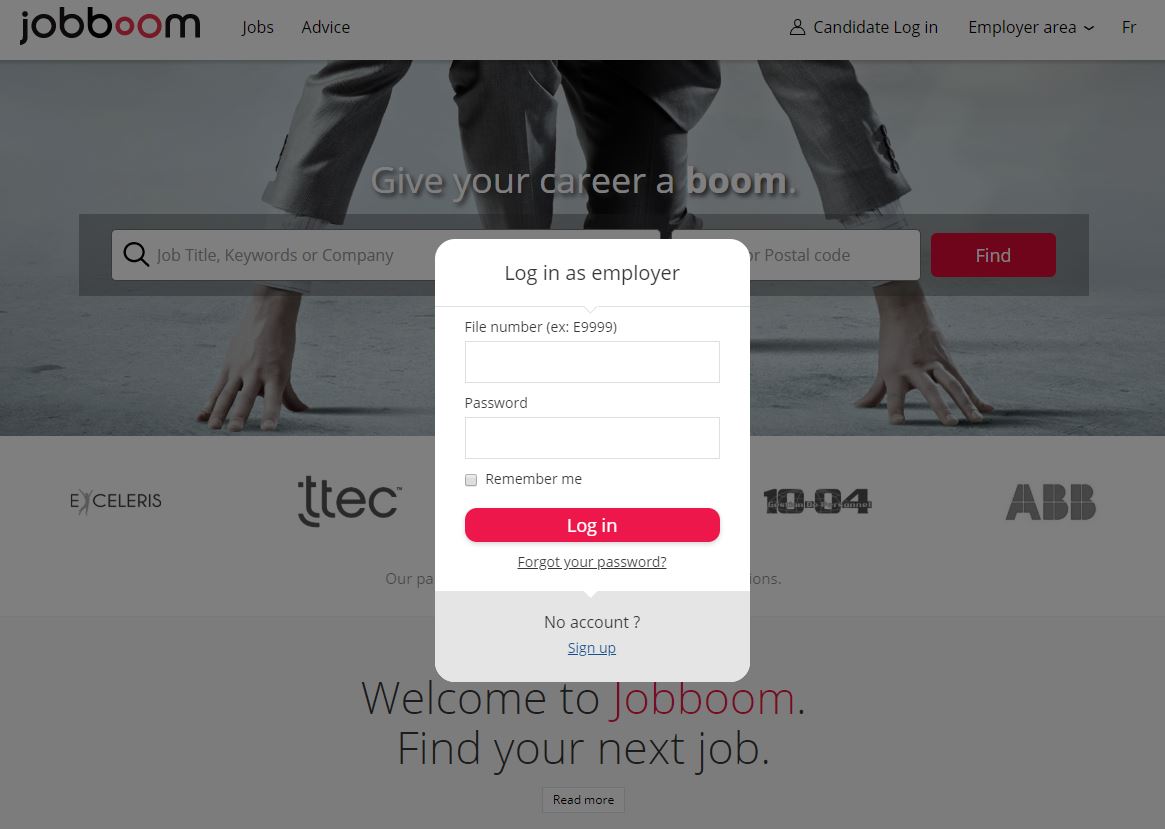
- Click on Log In and a window will appear.
- Enter your Jobboom account number (Example: E11111) and your password. Click Log In.
OVERVIEW OF THE DASHBOARD
In this section, we’ll review the menus and functions available from your Jobboom dashboard.

1_ Jobboom account number and name of organization
TOOLS
2_ Dashboard: This tab will return you to the Dashboard, regardless of which page you are on in your account.
3_ Create a posting: To create a new job offer, start here.
MANAGE ACCOUNT
Different menus (including Contact information and Company profile) allow you to modify the company and contact information found in your account. You can also configure your preferences to choose what information is shared with candidates when you post a job offer.
4_ Package: This dashboard displays the resources remaining in your Jobboom package and your package expiry date.
5_ Preferences: Here you can choose the notifications you would like to receive from Jobboom (e.g. sign up for newsletters or alerts, receive copies of your distribution, etc.)
6_ Contact information: View or modify the contact information for your organization.
7_ Company profile: Here you can describe your organization (in French and English) and detail contact information for your company.
8_ Methods of payment: This tab allows you to add or modify your method of payment (credit cards, etc.)
9_ Transaction history: Here you can find all information related to your transactions, including your current balance, date of last billing cycle, purchases, receipts and a list of all your completed payments.
REPRESENTATIVE
Here you can find the contact information for your Jobboom representative, who is available to answer any questions you have regarding purchases or package renewals.
CUSTOMER SERVICES
Here you can find contact information for our Customer Service department, who are available to answer any technical or website questions you may have.
CREATING A POST
This section will walk you through the process to create a job offer on Jobboom. To get started, click on Create a posting in the Tools section found on the left side of the page.
Post details
Here is what you need to know in order to fill out each section of the form. Mandatory fields are marked with a red asterisk (*).

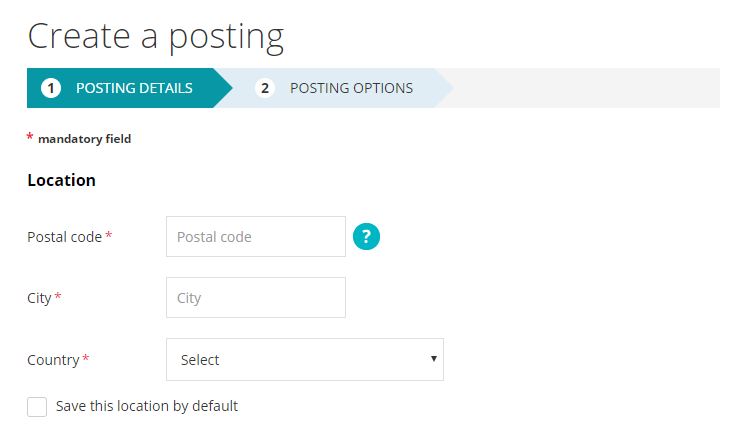
LOCATION
1_ Postal code: Enter the postal code of the region where the position is located. Don’t worry, candidates won’t have access to this information.
- After entering the postal code, the following fields will automatically be filled: City/Country/Province/Region.
Make sure to enter the correct information. If you make an error, please contact the Jobboom Customer Service team.
By default, you have the option to save the geographic information you enter. If you do, it will be automatically entered when creating other positions.
- 2_ Posting Language : Select which language(s) you want your posting to be published in. If the position is being offered in the province of Quebec, a French version of the posting must be published by law. If you choose to create a posting in English as well as French, an French version of the form to fill out will appear for all the following fields.
TITLE OF POST
3_ Job Title : Enter the title of the position being offered in this section. It’s very important to choose relevant keywords for the title, since the keywords will be used by jobseekers when searching for open positions on Jobboom.
4_ Internal reference: The internal reference corresponds to a job posting number associated with the position being offered and is used to manage the posting internally. This reference will appear at all times, even if the position is confidential. This field is not mandatory.
TYPE OF POSITION
Information including status of the post, start date and the annual salary offered for the position can all be entered at this stage.
5_ Status: The options available include Permanent / Contract-Freelance (for a predefined period) / Internship / Summer job
The fields discussed below are not mandatory, but we advise you to include as much information as possible to candidates to allow them to be sure their profile meets your needs.
6_ Start date: You can enter either a specific date or indicate the position needs to be filled “as soon as possible”.
7_ Hours per week: Enter the weekly number of hours the position entails and specify whether it is a full-time or part-time position.
8_ Work shift : If your organization offers shift work throughout the full 24-hour day, you can indicate which shift the position adheres to. Options available include Day / Evening / Night / Weekend / On call.
9_ Salary: Two options are available in this section. You can choose to indicate the precise salary offered or a salary range. Then you can indicate whether the salary is paid hourly, daily, weekly monthly or yearly.
10_ Salary benefits: Here is where you can indicate any bonuses, commissions or tips that are associated with the position.
11_ Travel requirements: Here you can indicate if the position requires regular travel, including if a percentage of the position is dedicated to travel.
12_ Confidential position: By selecting this option, information about your organization will be hidden in order to make the post anonymous. This option is often used by employers to replace an employee internally, without risking that the person being replaced will find out about it.
COMPANY INFORMATION
This section allows you to enter the industry sector information about the company that will be posted with confidential job postings.
JOB DESCRIPTION
13_ English version: This is the central section of the job offer. You have a 10,000-character limit (spaces included) to describe the position and to detail the tasks that the job entails.

Because it’s important to make your offer stand out as much as possible from other job offers posted on Jobboom, this section is designated to allow you to include as much detail as possible in order to attract attention from candidates. For example, mentioning benefits associated with the position being offered (such as an employer-matched RRSP program) can incite a jobseeker to apply for a job. Just like in the Job Title section, the keywords used in this descriptive text will have an impact on the keyword-driven search results that jobseekers will see when they search for offers.
(If you’ve chosen to create an French posting as per section 2, a Description field in French will appear as well.)
FUNCTIONS AND REQUIREMENTS

14_ Main duties: Your job offer must be classified among the 16 employment sectors described on the site. By clicking on Choose an industry, a drop-down menu will appear with the choices available. Each sector contains a list of Main duties that you can select and toggle to the right in the My selections
Your choice must be limited to a single sector of employment and you can select up to three main tasks and three areas of activity (if applicable). For example, you cannot select a task under the Sales sector and then another task from the Senior Executives sector.
These selections must be based mainly on the position to be filled or the education and skills that the ideal candidate must possess. For example, if a construction company is looking for an Accounts Payable clerk, the sector to indicate will be Accounting, finance and insurance, not Construction, production and handling.
The targeted distribution of your post by email will be done according to the region and the main tasks selected.
15_ Requirements: This section is optional. You may enter up to five requirements, which are criteria that are essential, important or a plus to have for candidates applying for the position.
When a candidate responds to a job offer, they need to specify if they meet all of the requirements for the position. Their answers will generate a note with a percentage match that will be tied to their candidature in your account. This tool is useful for determining which applicants meet your criteria for the position.
KNOWLEDGE AND ABILITIES
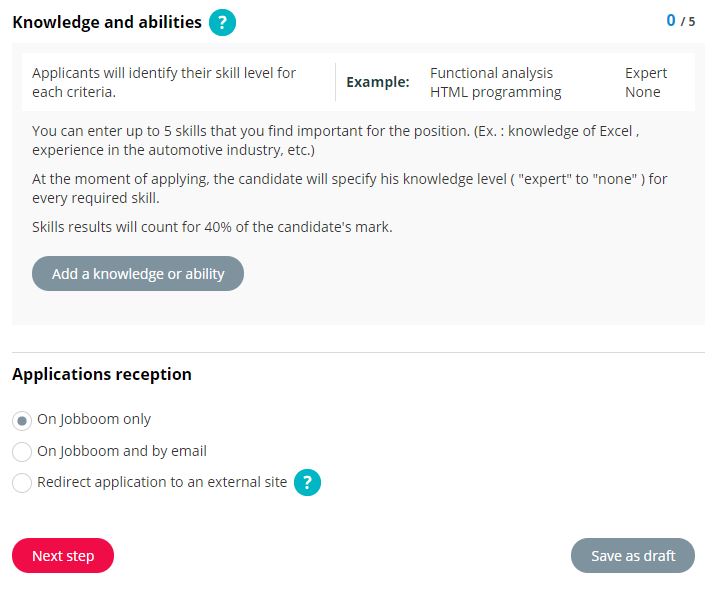
16_ Knowledge and abilities: This section is optional. As in the Requirements section, you can enter up to five criteria or knowledge requirements.
The difference lies in the type of question that will be asked of the person who is applying. Rather than a ‘yes or no’ question, questions related to knowledge and abilities require a graded response that allows the applicant to select their level of knowledge or ability (from ‘No knowledge’ to ‘Expert’). As in the Requirements section, the answers given by a candidate will generate a note with a percentage match, allowing you to quickly assess the suitability of the applicant.
17_ Applications reception: This field allows you to indicate how you would like to receive the applications for the position being offered. There are three options available:
- On Jobboom only. You will be able to see all interested candidates by logging in to your Jobboom Employer Account.
- On Jobboom and by email. If you choose this option, you will be prompted to enter the email address where you want applications from interested candidates sent. They will also be accessible in your Jobboom account.
- Redirect application to an external site. With this option, candidates that are interested in your offer will be automatically redirected to your website to apply. If you choose this option, you need to provide the link to the site where candidates will be redirected. You can provide links to your site in French and in English.
18_ Next Step button: Once all the mandatory fields in the form have been filled out, pressing this red button will save all the information you’ve entered. If any mandatory information is missing, the system will indicate what needs to be completed.
It’s essential to click the Next Step button to save any additions or modifications to the content of the post. If, for example, you press the ‘back’ button on your browser without clicking Next Step, the information you entered will be lost.
19_ Save as Draft button: This button allows you to save your draft without having filled out all the required fields. Only the Post title and Postal code fields need to contain text for you to save a draft. In this way, you can save a draft before it’s completed and come back to work on it later.
POSTING OPTIONS
This second and final step in the creation of a job offer involves choosing your visibility options before publishing the post online.
Here are the three visibility options you can choose from:
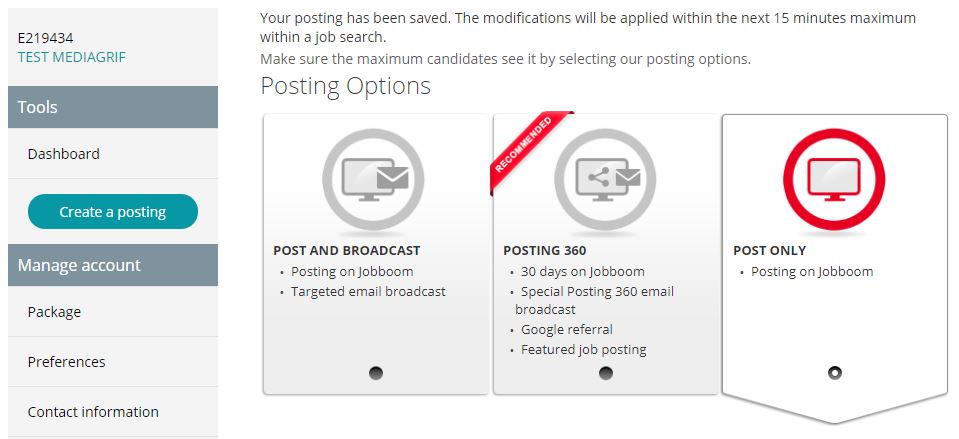
A – Post and Broadcast: This option allows you to place your job offer on Jobboom for a predetermined number of days of your choosing.
If you find the right person for the job before the display period is finished, you can unpublish the post by unchecking the Display box for the job offer from the Dashboard.
Here is the menu that will appear when this option is selected:
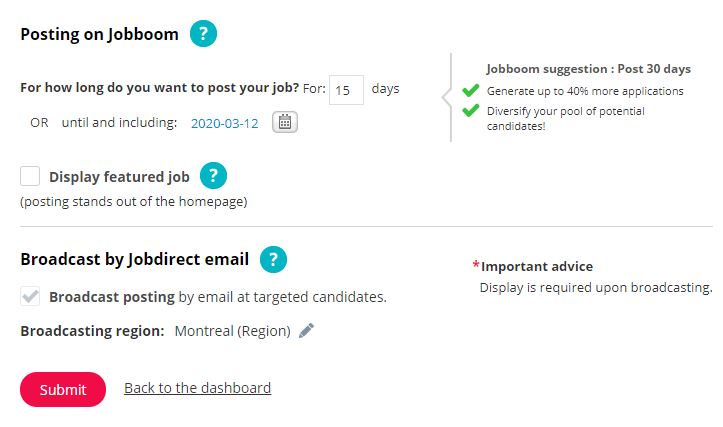
1 – Posting on Jobboom: This option allows you to select a specific number of days to display your post, and/or to indicate an end date for the post using the calendar.
2 – Display featured job: This tool generates more visits for your post by displaying your post in the center of the Jobboom homepage. This option debits two days from your Jobboom package for each Featured posting day. For example, a post displayed as a Featured post for three days will use up six regular posting days from your package.
3 – Broadcast by Jobdirect email: This option will be automatically selected, because you chose the Display and distribution option. Accordingly, your job offer will be sent by email to all candidates whose profiles meet the requirements of the position and who are signed up to receive notifications from Jobboom.
4 – Submit button: This button finalizes and publishes your post. After clicking it, your post will appear live on Jobboom within 15 minutes.
B – Posting 360: This option comprises a wide range of tools designed to maximize the number of views (and, indirectly, the number of candidatures) your job offer receives. In addition to being displayed on the site, your job offer will be distributed in a targeted email campaign for five consecutive days. Your post will also be displayed as a “Featured Job” for five days in the center of the Jobboom homepage. What’s more, a Google Ad campaign will be launched via the Google search engine. This option comprises a 30-day display period that cannot be interrupted by you once it has begun.
Here is a visual description of how Posting 360 works:
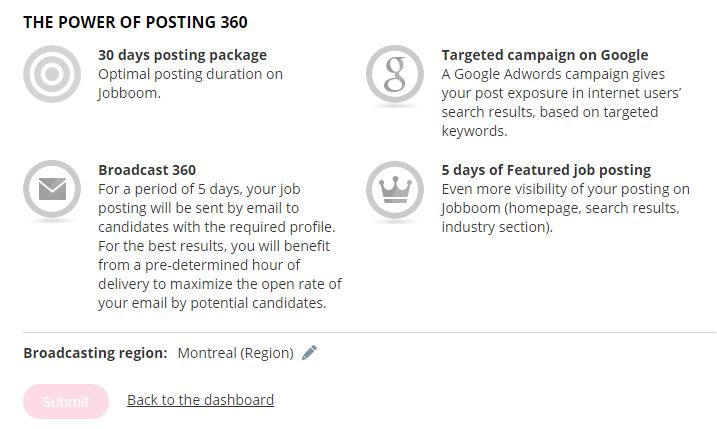
1 – The Power of Posting 360: This rubric describes all the tools that will be used to draw attention to your job offer, on Jobboom and elsewhere.
2 – 30-days posting package: Your job offer will be posted for 30 consecutive days on Jobboom.
3 – Broadcast 360: During a 5-day period, candidates who meet the requirements of the position and who are signed up to receive notifications from Jobboom will receive targeted distribution of your job offer by email. The timing of the distribution is chosen to maximize the open rate by potential candidates.
4 – Targeted campaign on Google: Your post will be distributed in a Google Ad campaign and will appear in the Google search results of internet users, based on targeted keywords.
5 – 5 days of Featured job posting: This tool generates more visits to your post by displaying your job offer in the center of the Jobboom homepage.
6 – Submit button: This button finalizes your post and publishes it online. After clicking this button, your job offer will go live on Jobboom within 15 minutes.
C – Post only: This option allows you to display your job offer on Jobboom for a specific number of days that you can configure.
If you find the right person for the position before the display period is finished, you can stop the online display by unchecking the box marked “Display” in your employer Dashboard.
Here are the menus that provide the visibility options:

1 – Posting on Jobboom: This option allows you to select a specific number of days to display your post, and/or to indicate an end date for the post using the calendar.
2 – Display featured job: This tool generates more visits for your post by displaying your post in the center of the Jobboom homepage. This option debits two days from your Jobboom package for each Featured posting day. For example, a post displayed as a Featured post for three days will use up six regular posting days from your package.
3 – Submit button: This button finalizes and publishes your post. After clicking it, your post will appear live on Jobboom within 15 minutes.
MANAGE MY POSTINGS
Manage my postings: This section compiles all the job offers that have been created with your account. You can consult and modify the information for each post.
This area contains useful information that you can quickly glean.
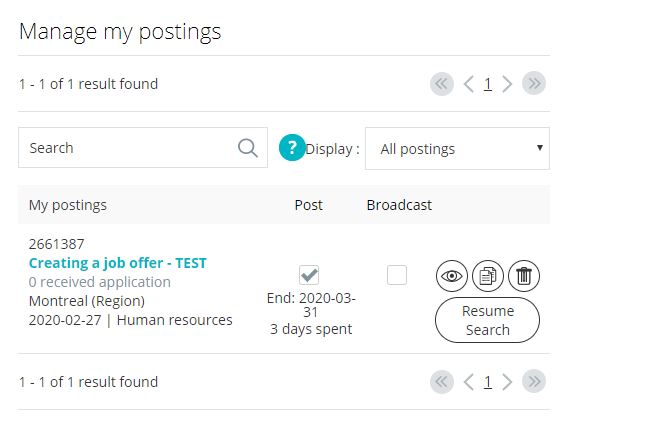
- Post number: A unique number is created by the system for each post you create.
- Title of job offer: You can click on the title to see the post creation form and the content of the post.
- Number of received applications: This option allows you to consult all the applications received for that post.
- Geographic region: Where the post is classified.
- This Date indicates when the post was last modified OR when the most recent application for the job offer was received (only the most recent of these two possibilities is displayed).
- Employment sector in which the post is classified.
- Post: If this box is checked, it means your offer is currently live on Jobboom. The last day of the display period is shown below the box, as well as the number of posting days that have been used for the post.
- Broadcast: This indicates if there is email distribution associated with your job offer.
- Visualize icon: This option allows you to see how your post will appear to jobseekers visiting Jobboom.
- Copy icon: This option allows you to make a copy of the content of the job offer.
- Erase icon: This function allows you to delete the job offer selected.
The Jobboom customer service team is always available to answer any questions you may have. Contact them at [email protected].
Happy Recruiting!
Leave a Reply